· Stefan Zeirov
A complete step-by-step guide to building a headless solution with Umbraco on-premise
A hands-on walkthrough for .NET developers who need a production-ready headless CMS on their own infrastructure — from a blank machine to a live Content Delivery API in one sitting.
This guide walks you through everything — from a brand-new machine with nothing installed, to a fully running Umbraco headless back office you can access in your browser. No assumed knowledge: every tool that needs to be installed is covered, every command is explained, and every configuration file is shown in full. By the end you will have a working local Umbraco 16 site exposing its built-in Content Delivery API, ready to be queried by any front-end framework or HTTP client.
Umbraco version note: Umbraco 16 was released on 12 June 2025 and runs on .NET 9. It is a short-term support (STS) release — the stepping stone before Umbraco 17 LTS (based on .NET 10), arriving in late 2025. If you need long-term support, consider targeting Umbraco 17 once it is released. Everything in this guide applies to both.
Introduction: why headless Umbraco?
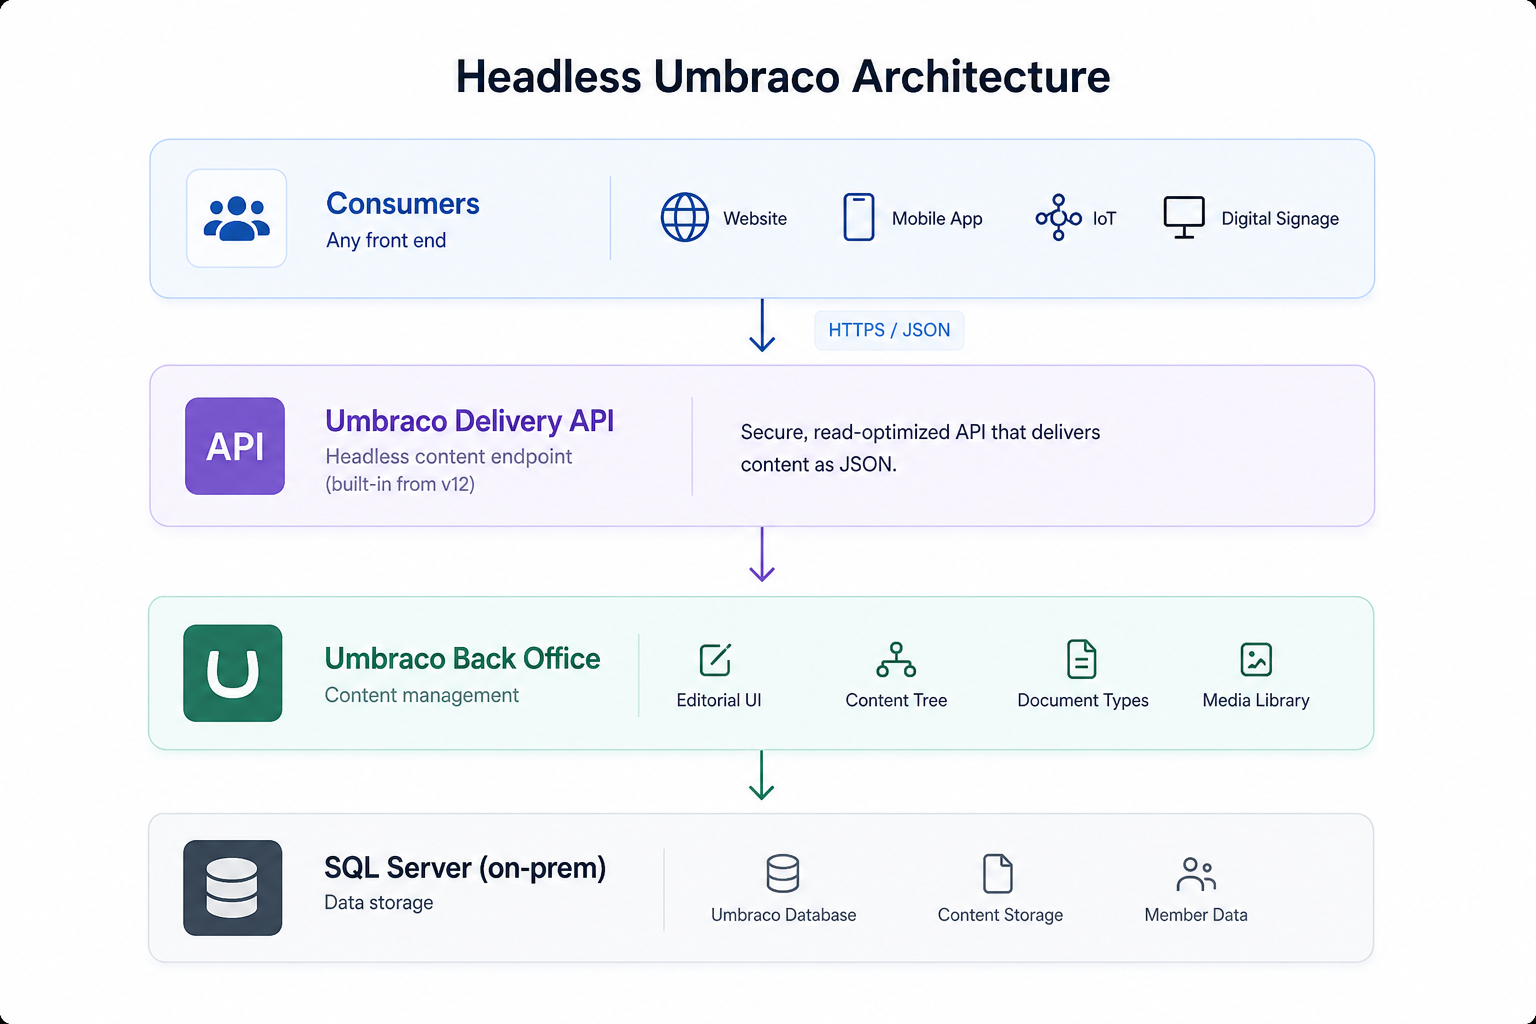
The default Umbraco setup renders HTML server-side using Razor views. It works well for traditional websites, but it creates a hard coupling: your presentation layer is baked into the CMS. Going headless breaks that coupling. Umbraco becomes a content repository with a management UI — a "content hub" — and your front-end teams are free to use whichever framework they prefer: Next.js, Nuxt, a native mobile app, or anything that can make an HTTP request.
On-premise hosting adds an extra dimension. You own the infrastructure, which means you control performance, data residency, and network topology — but you're also responsible for every layer from IIS configuration to SQL Server maintenance. This guide covers both the Umbraco-specific steps and the on-premise infrastructure considerations that a cloud-hosted guide glosses over.
Install every prerequisite
Before writing a single line of code, you need four pieces of software on your development machine. Each one is covered below with download links, installer options, and a verification command so you know it worked.
The four things you need are: the .NET 9 SDK, SQL Server (LocalDB or Express), Visual Studio 2022 or VS Code, and optionally Git for version control.
0.1 Install the .NET 9 SDK
Umbraco 16 runs on .NET 9. Download the SDK installer (not the Runtime — the SDK includes everything) from here. Run the installer and accept the defaults. When it finishes, open a new terminal window and verify:
terminal — verify .NET SDK installed correctly
dotnet --version
# Expected output: 9.0.x  (any patch version is fine)

dotnet --list-sdks
# You should see at least one entry starting with 9.0
If the command is not found, close and reopen your terminal — the installer modifies the PATH and old terminal windows won't see it yet.
0.2 Install SQL Server
This guide uses a full local SQL Server instance — either SQL Server Express (free) or Developer Edition (also free, full-featured). Download SQL Server from here and choose the Basic install type for Express, or the Custom install for Developer Edition. You will also need SQL Server Management Studio (SSMS) from here to manage databases and verify connectivity.
Once SQL Server is installed, open SSMS and connect using Windows Authentication to confirm the instance is running. Note the server name exactly as it appears in the SSMS connection dialog — you will use this in your connection string later. For a default instance it is your machine name alone (e.g. DESKTOP-PHGNM1O). For SQL Server Express it is your machine name followed by the instance name (e.g. DESKTOP-PHGNM1O\SQLEXPRESS).
0.3 Node.js is not required
Umbraco 16's back office does not require Node.js to run or to scaffold the project. Node.js is only needed if you are building a separate JavaScript front-end app (Next.js, Nuxt, etc.) that will consume the API. It is not needed for anything in this guide.
1 Scaffold the Umbraco project
1.1 Install the Umbraco .NET templates
The official Umbraco templates give you a dotnet new umbraco command. Install them from NuGet once per machine:
terminal — install Umbraco templates globally
dotnet new install Umbraco.Templates
After installation, verify the template is available:
terminal — confirm the template is registered
dotnet new list | findstr /I "umbraco"
# You should see entries for: umbraco, umbraco-package, umbraco-extension
1.2 Create the project
Navigate to the folder where you keep your projects and scaffold the project. Because the database connection will be configured directly in appsettings.json in the next phase, you do not need to pass a connection string here:
terminal — scaffold a new Umbraco 16 project
cd C:\Projects

dotnet new umbraco `
  -n MyHeadlessCms `
  --friendly-name "Admin" `
  --email "admin@yourdomain.com" `
  --password "Str0ngP@ssword!"
What each flag does:
-n MyHeadlessCms — the folder and project name that gets created
--friendly-name — the display name for the first admin user in the back office
-email and --password — the credentials you'll use to log into /umbraco
terminal — move into the new project folder
cd MyHeadlessCms
1.3 Understand the generated project structure
folder structure after scaffolding
MyHeadlessCms/
├── appsettings.json          ← main config — you will edit this next
├── appsettings.Development.json
├── Program.cs                ← ASP.NET Core startup — you'll add one line here
├── MyHeadlessCms.csproj      ← NuGet package references
├── umbraco/
│   ├── config/               ← Umbraco-specific XML config files
│   ├── Data/                 ← local file-based data (Examine index, etc.)
│   └── Logs/                 ← log files written at runtime
└── wwwroot/                  ← static files (CSS, JS, images)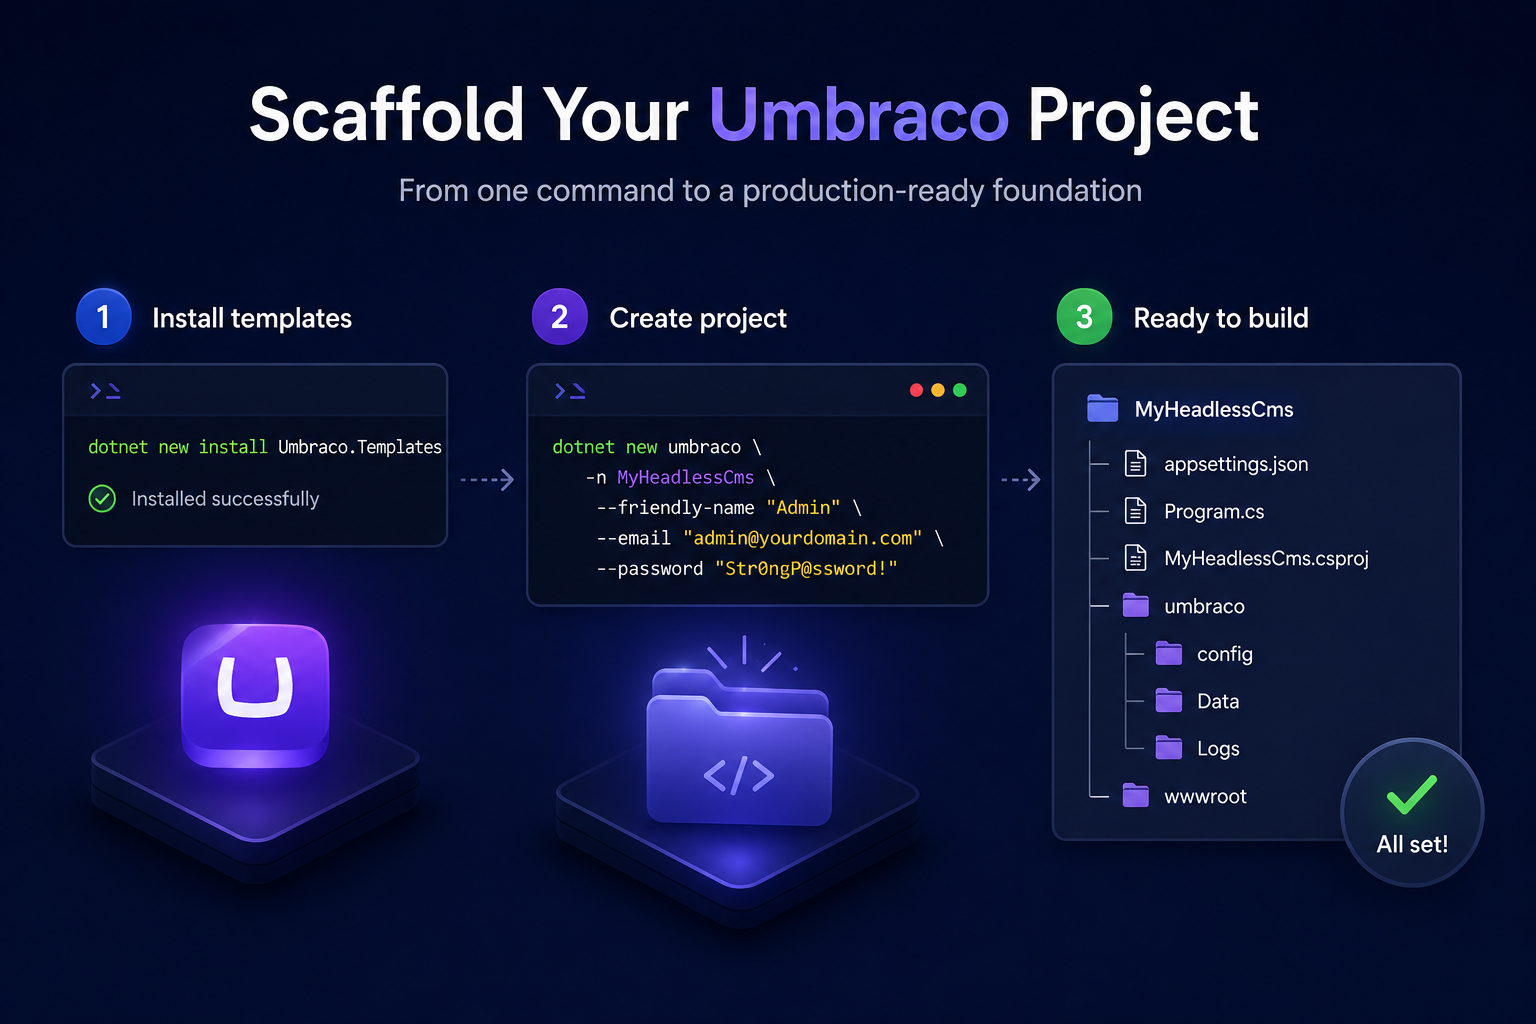
2 Configure the database connection
Now that the project exists, you configure it to talk to your local SQL Server instance. This happens in two steps: create the database in SQL Server, then wire up the connection string in appsettings.json.
2.1 Create the database in SQL Server
Umbraco creates all its tables automatically on first run, but the database itself must exist first. Open SSMS, connect to your local instance, and run:
SQL — create the Umbraco database
CREATE DATABASE ahd_headless_DB;
GO
Alternatively, right-click Databases in the Object Explorer → New Database and type ahd_headless_DB as the name. Make sure your Windows user account has db_owner rights on this database — because the connection string uses Windows authentication (Integrated Security=true), SQL Server will use the identity of the process running your .NET application, which is your Windows account during local development.
2.2 Add the connection string to appsettings.json
Open appsettings.json in your editor. Add the ConnectionStrings block at the root level of the JSON — outside and above the Umbraco block. Your full appsettings.json should look like this:
appsettings.json — complete file with connection string
{
"ConnectionStrings": {
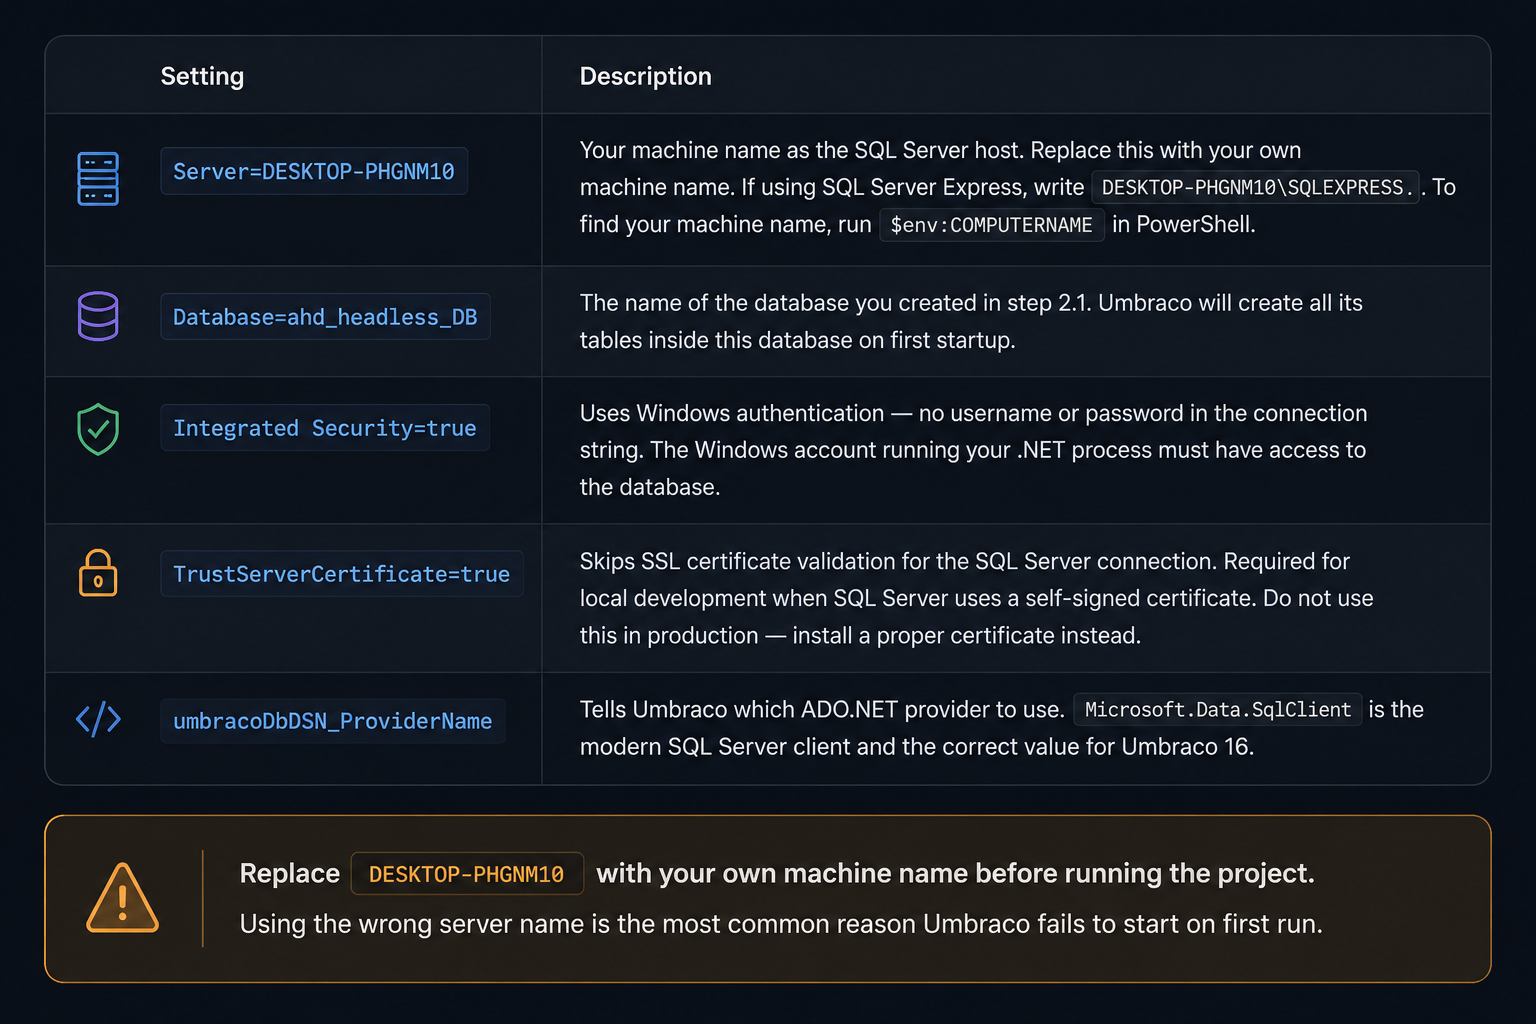
"umbracoDbDSN": "Server=DESKTOP-PHGNM1O;Database=ahd_headless_DB;Integrated Security=true;TrustServerCertificate=true;",
"umbracoDbDSN_ProviderName": "Microsoft.Data.SqlClient"
},
"Umbraco": {
"CMS": {
"Global": {
"Id": "your-existing-guid-here",
"NoNodesViewPath": "~/umbraco/UmbracoWebsite/NoNodes/NoNodes.cshtml"
}
}
}
}What each part of the connection string means:
2.3 Verify the connection before running Umbraco
Run this PowerShell snippet to confirm SQL Server is reachable using the same credentials your .NET process will use. If this succeeds, Umbraco will be able to connect:
powershell — test SQL Server connectivity
$conn = New-Object System.Data.SqlClient.SqlConnection `
  "Server=DESKTOP-PHGNM1O;Database=ahd_headless_DB;Integrated Security=true;TrustServerCertificate=true;"
$conn.Open()
Write-Host "Connection state: $($conn.State)"
$conn.Close()
If the output is "Connection state: Open", SQL Server is reachable. Proceed to Phase 3 to enable the Delivery API and run the site.
3 Enable the Content Delivery API
Umbraco 16 ships with a built-in headless endpoint called the Content Delivery API. It is disabled by default — you must explicitly opt in. This involves two changes: one more addition to appsettings.json and one line in Program.cs.
3.1 Add the Delivery API config to appsettings.json
Open appsettings.json again and add the DeliveryApi block inside the Umbraco → CMS section:
appsettings.json — complete file including Delivery API config
{
  "ConnectionStrings": {
    "umbracoDbDSN": "Server=DESKTOP-PHGNM1O;Database=ahd_headless_DB;Integrated Security=true;TrustServerCertificate=true;",
    "umbracoDbDSN_ProviderName": "Microsoft.Data.SqlClient"
  },
  "Umbraco": {
    "CMS": {
      "Global": {
        "Id": "your-existing-guid-here",
        "NoNodesViewPath": "~/umbraco/UmbracoWebsite/NoNodes/NoNodes.cshtml"
      },
      "DeliveryApi": {
        "Enabled": true,
        "PublicAccess": false,
        "ApiKey": "local-dev-key-change-in-production",
        "RichTextOutputAsMarkdown": false,
        "DisallowedContentTypeAliases": []
      }
    }
  }
}
What each Delivery API setting does:
Enabled: true — turns the Delivery API on. Without this, the endpoint returns 404.
PublicAccess: false — requires every request to include an Api-Key header.
ApiKey — the secret your front-end must send in the Api-Key request header. Use any string locally; use a long random value in production.
RichTextOutputAsMarkdown: false — Rich Text Editor properties return HTML. Note: Umbraco 16 ships Tiptap as the default rich text editor, replacing TinyMCE.
3.2 Register the Delivery API in Program.cs
Open Program.cs and add .AddDeliveryApi() to the builder chain — it must come before .Build():
Program.cs — full file after the change
WebApplicationBuilder builder = WebApplication.CreateBuilder(args);

builder.CreateUmbracoBuilder()
    .AddBackOffice()
    .AddWebsite()
    .AddDeliveryApi()      // ← add this line
    .AddComposers()
    .Build();

WebApplication app = builder.Build();

await app.BootUmbracoAsync();

app.UseUmbraco()
    .WithMiddleware(u => {
        u.UseBackOffice();
        u.UseWebsite();
    })
    .WithEndpoints(u => {
        u.UseInstallerEndpoints();
        u.UseBackOfficeEndpoints();
        u.UseWebsiteEndpoints();
    });

await app.RunAsync();
Do not add CORS yet for local development. Your browser and your API testing tool are making requests from the same machine, so there is no cross-origin restriction. CORS is a server deployment concern.
4 Run the site locally
4.1 Trust the ASP.NET Core development certificate
Run this once per machine before starting any .NET web project:
terminal — trust the development certificate (run once per machine)
dotnet dev-certs https --trust
# A dialog will appear asking if you want to trust the certificate. Click Yes.
4.2 Start the site
terminal — start Umbraco in development mode
dotnet run
The first startup takes longer than subsequent ones because Umbraco is connecting to ahd_headless_DB, creating all its tables, seeding initial data, and building its Examine indexes. Expected terminal output:
expected terminal output
info: Umbraco.Cms.Core.Runtime.UmbracoApplicationLifetime[0]
      Umbraco 16.x.x started.
info: Microsoft.Hosting.Lifetime[14]
      Now listening on: https://localhost:44391
info: Microsoft.Hosting.Lifetime[14]
      Now listening on: http://localhost:5000
Site is running. Open your browser and navigate to the HTTPS URL shown in your terminal, for example https://localhost:44391. You should see a plain page — Umbraco has no front-end template yet. That is expected: this is a headless install.
4.3 Log into the back office
Append /umbraco to the URL shown in your terminal, for example https://localhost:44391/umbraco. Sign in with the email and password you set during scaffolding in step 1.2.
4.4 Verify the Delivery API endpoint is live
With the site still running, open a new terminal window and run a curl to confirm the Delivery API is responding:
terminal — test the Delivery API with no content yet
curl -X GET "https://localhost:44391/umbraco/delivery/api/v2/content" ^
  -H "Api-Key: local-dev-key-change-in-production" ^
  -H "Accept: application/json" ^
--ssl-no-revokeexpected JSON response — empty because nothing has been published yet
{
"total": 0,
"items": []
}The API is working. A total: 0 response with an empty items array means the endpoint is live and your API key is accepted.
5 Create content and expose it through the API
5.1 Create a document type
Go to Settings → Document Types in the back office and click Create → Document Type with template. Give it a name like Blog Post. Under the Design tab, add a group called "Content" and add these properties:
Title — property editor: Textstring
Body — property editor: Rich Text Editor (Tiptap in Umbraco 16)
PublishDate — property editor: Date Picker
Excerpt — property editor: Textarea
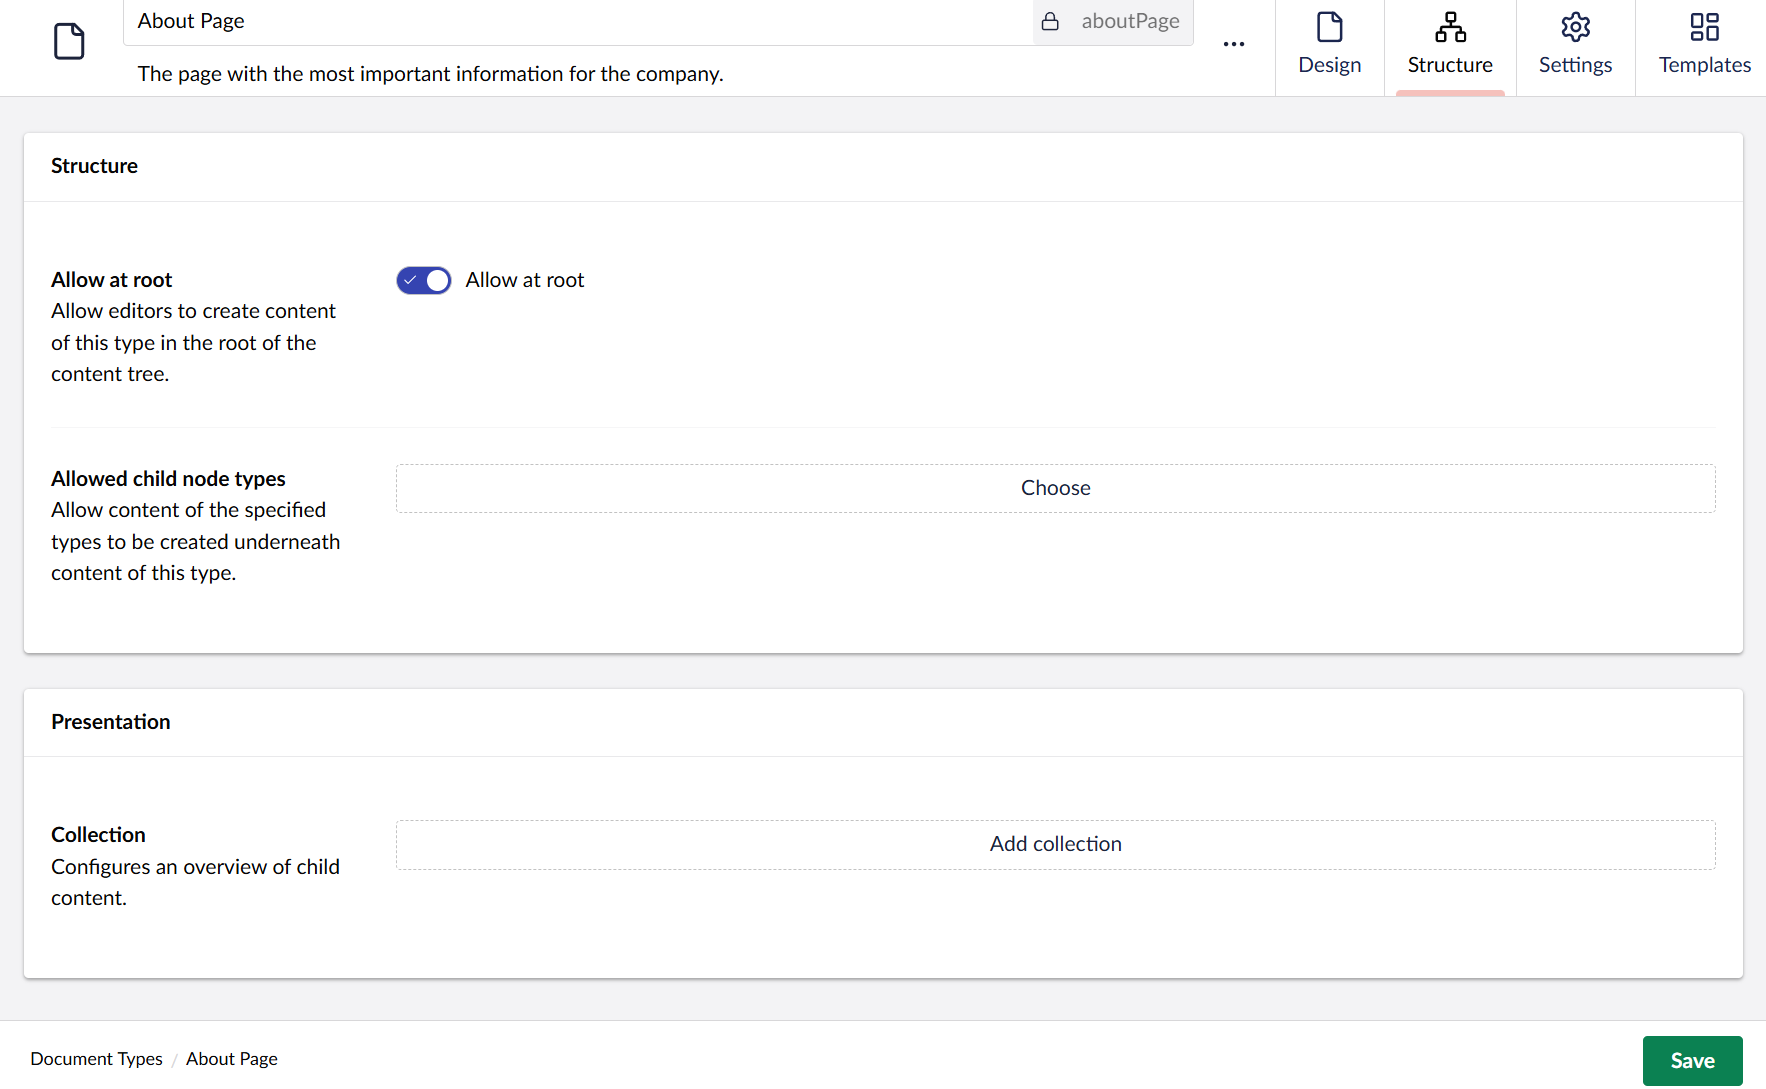
5.2 Configure permissions on the document type
Before saving, go to the Structure tab on the document type. There is a setting for Allow at root it must be checked so you can use the document type in Content tab.
5.3 Create and publish a content node
Go to Content in the left sidebar. Click the three-dot menu on the content root and choose Create. You should now see Blog Post in the list — if it's missing, go back to the document type and confirm "Allow at root" is enabled. Select Blog Post, fill in the Title and Body fields, then click the dropdown arrow next to the Save button and choose Save and publish.
5.4 Query the content from the API
With a published content node in place, your API call will now return real data. Open a terminal and run:
terminal — fetch all BlogPost content nodes
curl -X GET "https://localhost:44391/umbraco/delivery/api/v2/content?contentType=blogPost" ^
  -H "Api-Key: local-dev-key-change-in-production" ^
  -H "Accept: application/json" ^
--ssl-no-revoke{
"total": 1,
"items": [
{
"contentType": "blogPost",
"name": "My first blog post",
"id": "3a7f2b1e-c419-4e5d-a811-000000000001",
"properties": {
"title": "My first blog post",
"body": { "markup": "<p>Hello from Umbraco 16 headless!</p>" },
"publishDate": "2026-06-04T00:00:00",
"excerpt": "A short excerpt here."
}
}
]
}You can also fetch a single item by its GUID, which is more stable than fetching by URL since editors can rename content at any time:
terminal — fetch one item by ID
curl -X GET "https://localhost:44391/umbraco/delivery/api/v2/content/item/3a7f2b1e-..." ^
  -H "Api-Key: local-dev-key-change-in-production" ^
  --ssl-no-revoke
5.5 Explore the API using Umbraco's built-in Swagger UI
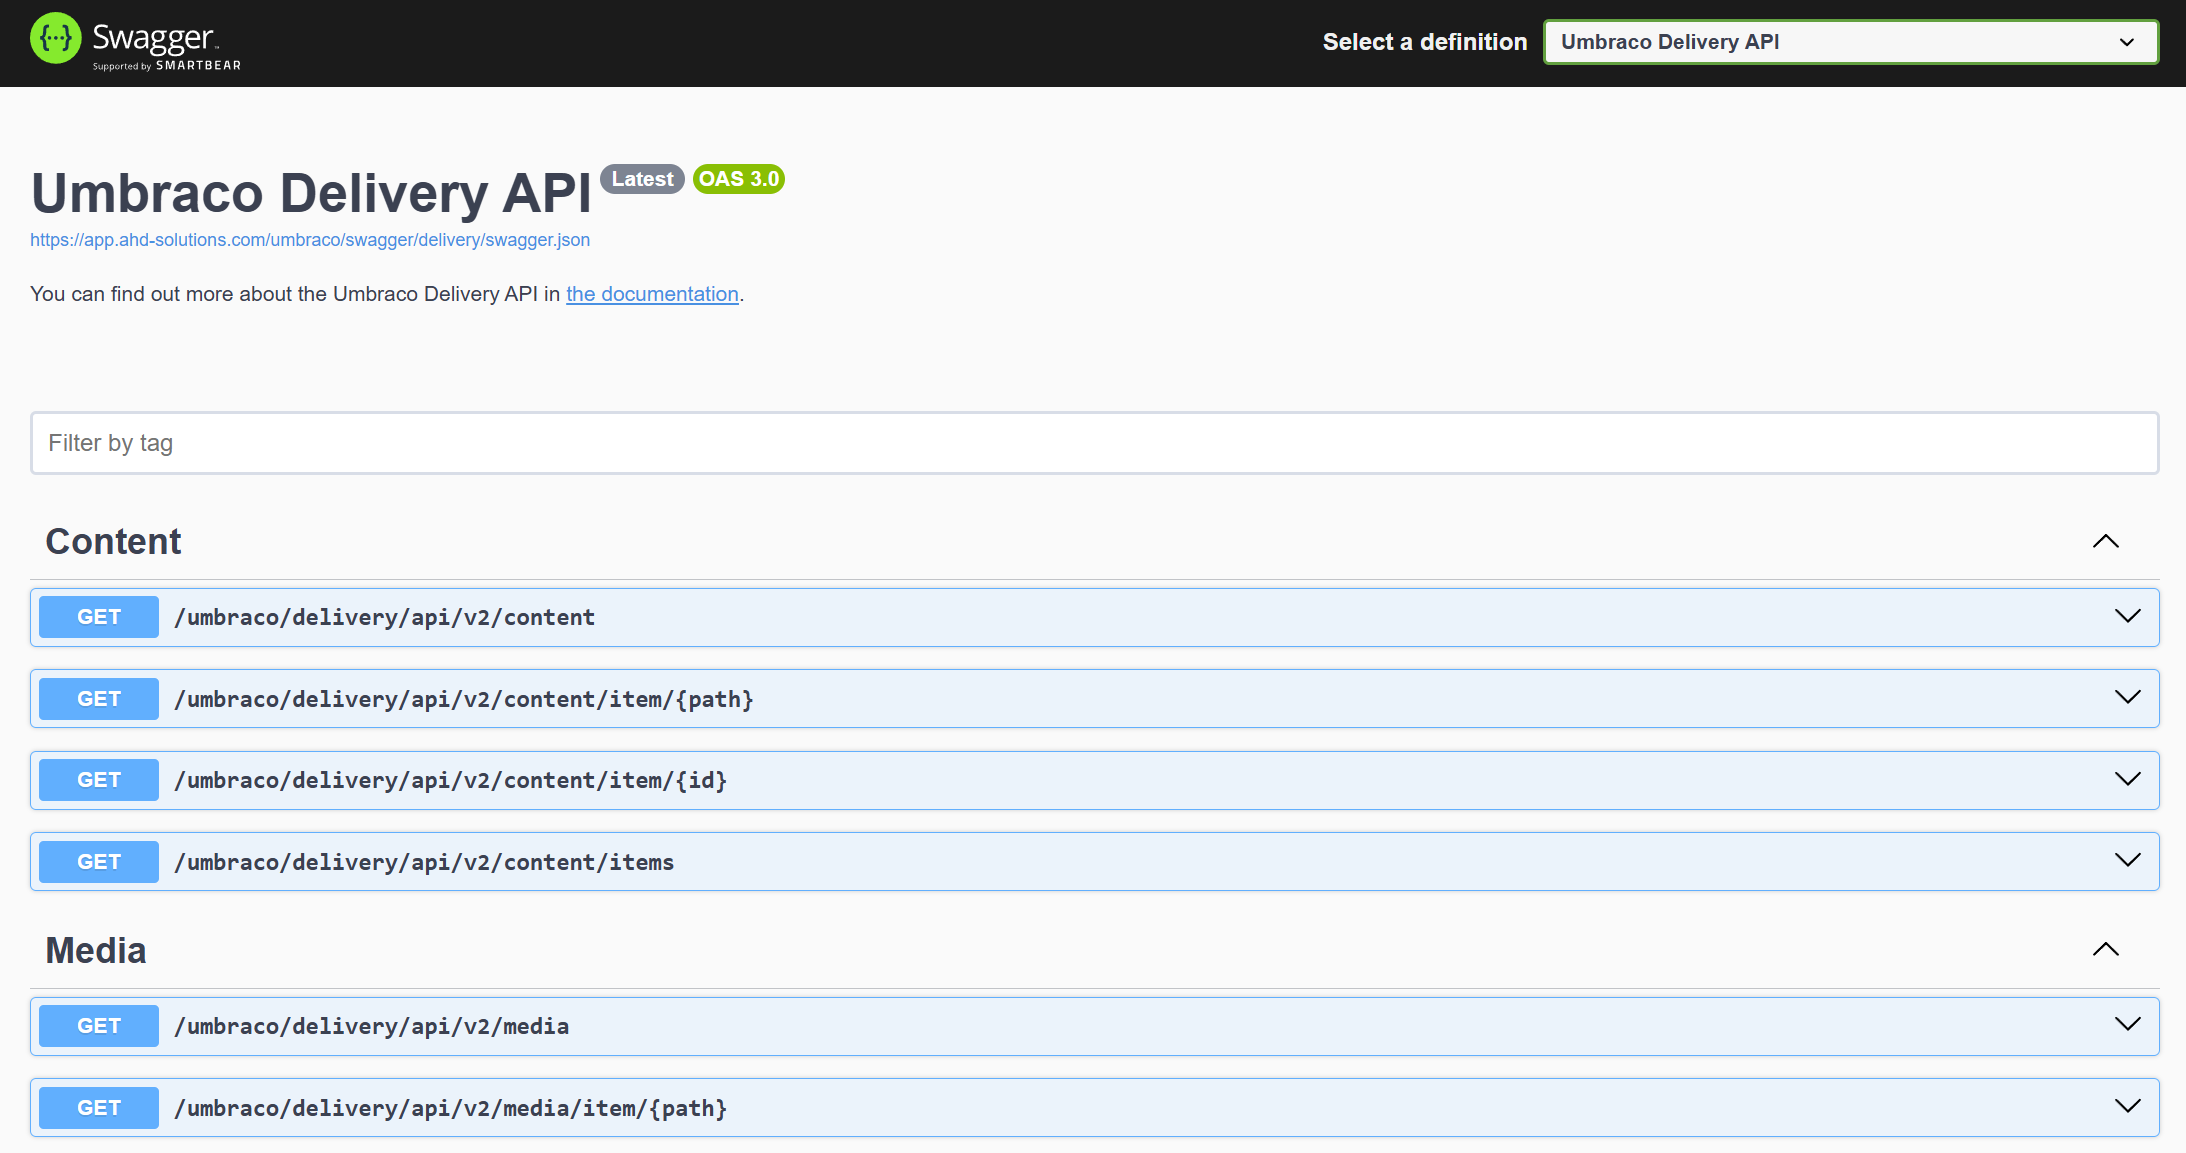
Umbraco 16 ships with a Swagger UI interface that documents the entire Content Delivery API interactively. You do not need curl or Postman to explore the API — you can browse every endpoint, see the expected request and response shapes, and send test requests directly from the browser.
With the site running, navigate to https://localhost:44391/umbraco/swagger. Switch to the "Umbraco Delivery API" definition in the top-right dropdown. To authenticate, click Authorize and enter your API key from appsettings.json.
You now have a fully working Umbraco 16 headless stack running locally: a back office your editors can use, a Content Delivery API returning clean JSON, and a Swagger interface to explore every endpoint without writing a single line of front-end code. From here the natural next steps are wiring up a front-end framework — Next.js and Nuxt both have strong Umbraco community examples — configuring CORS for cross-origin requests, and deploying to IIS on your on-premise server when you're ready to go live. The heavy lifting is done; what comes next is building on top of it.