· Refik Tefik
A Complete Step-by-Step Guide to Provisioning a Public-Facing Linux VM on Windows Server
A hands-on walkthrough for engineers who rent unmanaged dedicated servers and need a native, internet-facing Linux environment living alongside Windows.
Introduction: Why This Setup Exists
If you rent an unmanaged dedicated server, there's a good chance it shipped with Windows Server. It's a common default – enterprise teams like its management tooling, Active Directory integration, and familiar GUI. But sooner or later you hit the wall: your stack needs a real Linux box. Not a container, not a developer sandbox, but a persistent, 24/7, internet-facing Linux server with its own public IP address.
The tempting shortcut is WSL2 (Windows Subsystem for Linux). Resist it. WSL2 is a brilliant developer tool, but its lifecycle is tied to a user session and it sits behind NAT-based dynamic networking. It was never designed to host a production service that needs to be reachable from the open internet on a stable address.
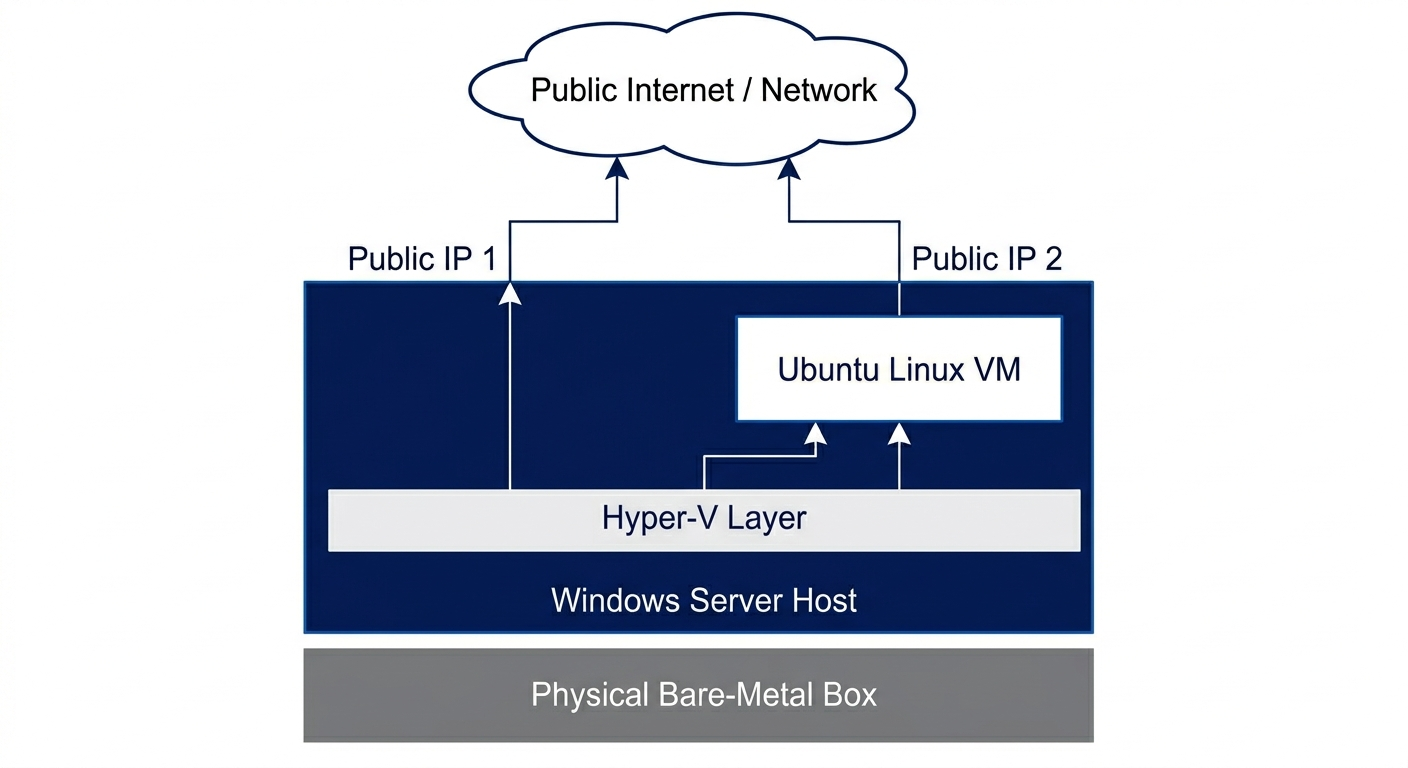
The correct approach is Hyper-V, the Type-1 hypervisor built into Windows Server. Hyper-V runs virtual machines directly on the hardware, giving you true isolation and – critically – the ability to assign a discrete, public IP address to your Linux VM.
This guide walks through the entire process: building the VM, getting past the boot traps, wrestling enterprise networking into submission, and locking the whole thing down before the botnets find it.
Prerequisites – What You Need Before You Start
Before touching anything, make sure you have:
A dedicated/bare-metal server running Windows Server (2019 or 2022 recommended) with administrator access.
The Hyper-V role available (we'll enable it below). This requires hardware virtualization (Intel VT-x / AMD-V), which essentially every modern server CPU supports.
An Ubuntu Server ISO (this guide uses Ubuntu Server LTS) downloaded to the host.
Access to your hosting provider's control panel — you'll need it to buy an additional IP and generate a virtual MAC address.
Your host server's gateway IP address (from your provider's networking page).
An SSH client on your local workstation (built into Windows 10/11, macOS, and Linux).
Phase 1: The Hyper-V Foundation and the Secure Boot Trap
Our goal in this phase is to spin up a persistent Ubuntu Server VM that runs completely independently of the Windows host.
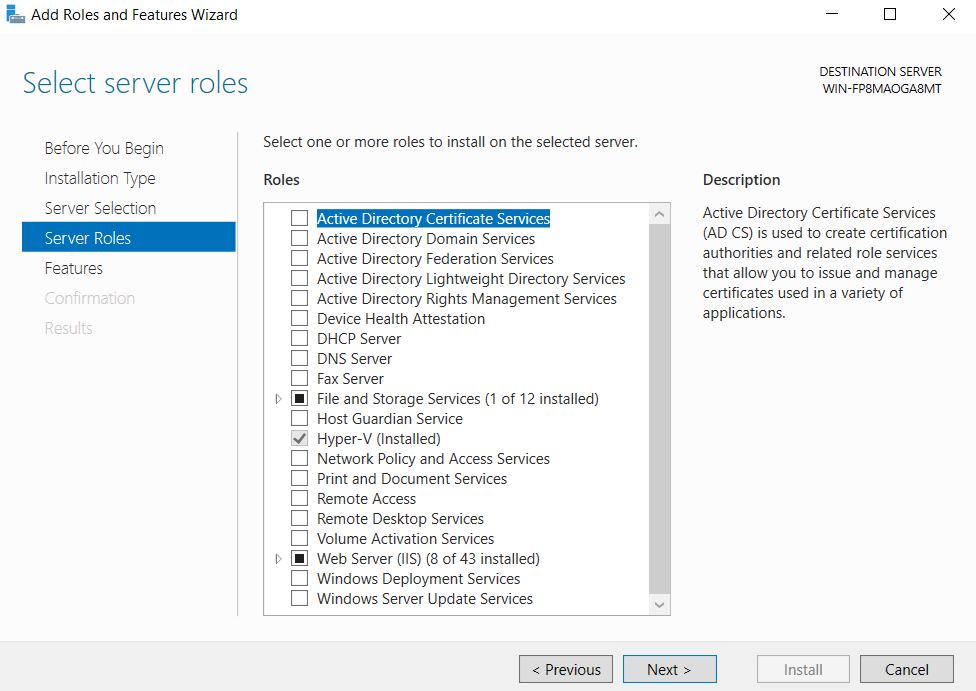
Step 1.1 — Enable the Hyper-V Role
If Hyper-V isn't already installed, open Server Manager → Manage → Add Roles and Features, and select Hyper-V. Alternatively, run this in an elevated PowerShell window:
Install-WindowsFeature -Name Hyper-V -IncludeManagementTools -RestartThe server will reboot to finish installing the hypervisor.
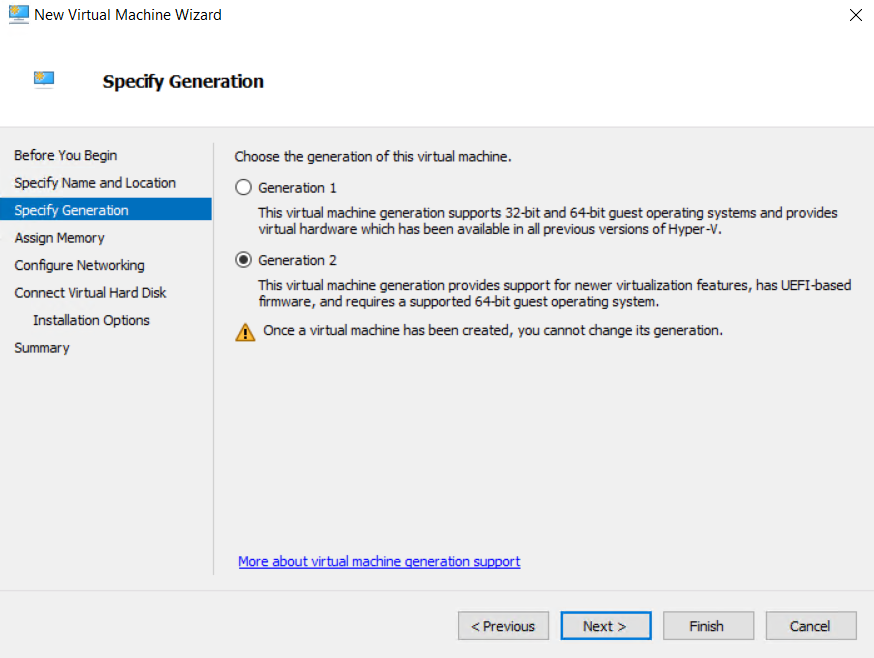
Step 1.2 — Provision a Generation 2 Virtual Machine
Open Hyper-V Manager, then Action → New → Virtual Machine. Walk through the wizard, and when you reach the generation choice, select Generation 2.
Why Generation 2 matters: Generation 1 VMs emulate legacy BIOS hardware from the early 2000s. Generation 2 drops that emulation in favor of UEFI, which gives you better boot performance, modern security features (like Secure Boot), and cleaner hardware abstraction for current Linux kernels. For any new Linux server in 2026, Generation 2 is the right choice.
During the wizard:
Assign a sensible amount of memory (e.g., 2048 MB or more; you can use Dynamic Memory).
Create or attach a virtual hard disk.
For the installation media, point it at your Ubuntu Server ISO.
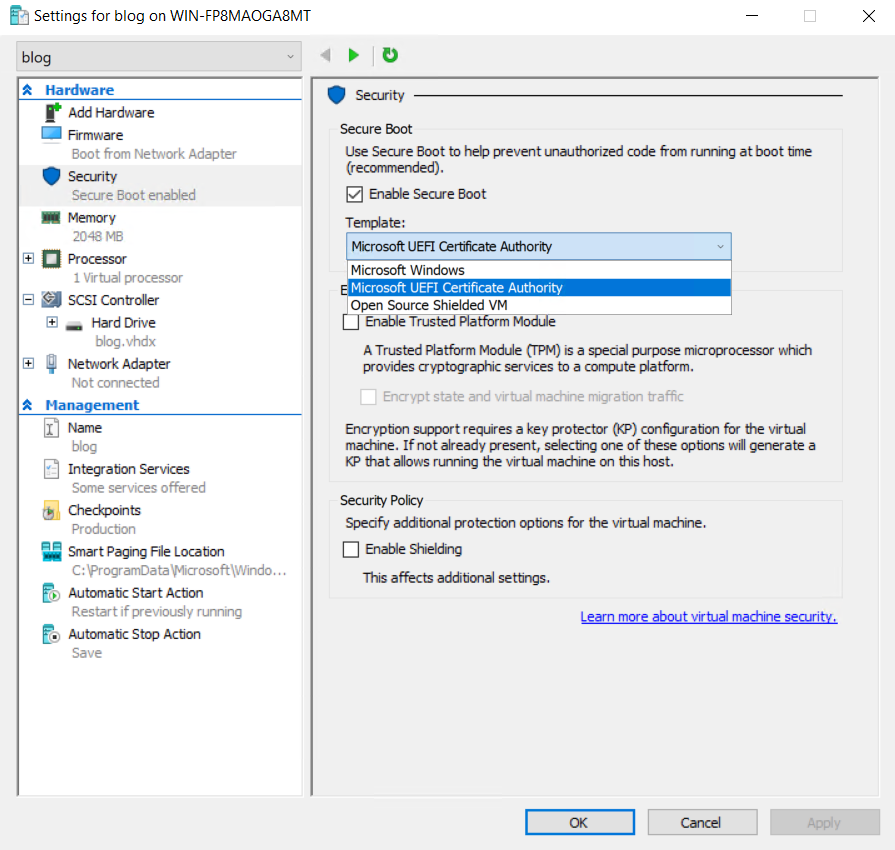
Step 1.3 — Defuse the UEFI Secure Boot Trap
Here's the gotcha that stops most people cold: if you attach the Ubuntu ISO and hit Start right now, the VM will refuse to boot.
Why it happens: By default, Hyper-V enforces Secure Boot using the Microsoft Windows cryptographic template. That template only trusts bootloaders signed by Microsoft's Windows certificate. Linux boots via the GRUB bootloader, which is signed by a different authority (the Microsoft UEFI CA, which co-signs third-party shims). Because the signature doesn't match the Windows template, the hypervisor halts the boot immediately.
The fix: Before starting the VM, right-click it in Hyper-V Manager and open Settings. Go to the Security tab, and under Secure Boot, change the template from Microsoft Windows to Microsoft UEFI Certificate Authority.
This tells Hyper-V to trust properly-signed third-party OS bootloaders — which includes Ubuntu's. (You could disable Secure Boot entirely, but switching the template keeps the protection on while allowing Linux to boot, which is the better practice.)
Step 1.4 — Install Ubuntu Server
Start the VM and connect to its console (double-click the VM in Hyper-V Manager). Proceed through the standard Ubuntu Server installer. A few notes:
You can accept defaults for most steps.
When prompted about networking during install, it's fine to leave it on DHCP for now — we'll override it manually in Phase 3.
Be sure to install the OpenSSH server when the installer offers it; it saves a step later.
Phase 2: Layer 2 Networking and MAC Spoofing
This is where home-lab knowledge and enterprise reality part ways. On a home network, you bridge the VM to your physical adapter and your router happily hands it an IP via DHCP. In a data center, that won't work — and understanding why is essential.
The Core Problem: MAC Address Filtering
Enterprise data center switches use strict MAC address filtering to defend against ARP spoofing and IP hijacking. Every port expects to see traffic only from MAC addresses the provider has authorized. When Hyper-V generates a random MAC for your new VM and tries to send packets to the internet, the switch sees an unrecognized MAC and silently drops every packet. Your VM appears completely dead to the outside world, even though everything looks fine inside Windows.
The solution is a two-part handshake: get an authorized MAC from your provider, then map it onto the VM.
Step 2.1 — Purchase an Additional IP and Generate a Virtual MAC
In your hosting provider's control panel:
Order or allocate an Additional IP (sometimes called a "failover IP" or "secondary IP").
Once it's assigned, find the option to generate a Virtual MAC address tied to that specific IP. Most providers (OVH, Hetzner, Leaseweb, etc.) have this exact feature, though the menu names vary.
This virtual MAC is the credential the data center switch will recognize. The IP and the MAC are now a bonded pair in the provider's network.
Step 2.2 — Map the Virtual MAC in Hyper-V
Back in Hyper-V Manager, open your VM's Settings:
Expand the Network Adapter entry in the left pane.
Click Advanced Features.
Under MAC address, switch from Dynamic to Static.
Paste the exact virtual MAC address from your provider (formatting/separators must match what Hyper-V expects — typically no colons, or as the field requires).
Save the settings. Your VM is now presenting a MAC address the data center switch trusts, so its packets will be allowed onto the physical network.
In the next part we will continue with Netplan and security.