How to wire up Google Tag Manager and Meta Pixel
A practical guide to installing GTM, gating Meta Pixel behind Consent Mode v2, and deduplicating browser and server conversions.
Most tracking setups start the same way. Someone pastes the Google Tag Manager snippet into the site, someone else pastes the Meta Pixel base code into the header, and a few months later nobody can explain why purchases are counted twice or why the pixel fires before the visitor has accepted cookies.
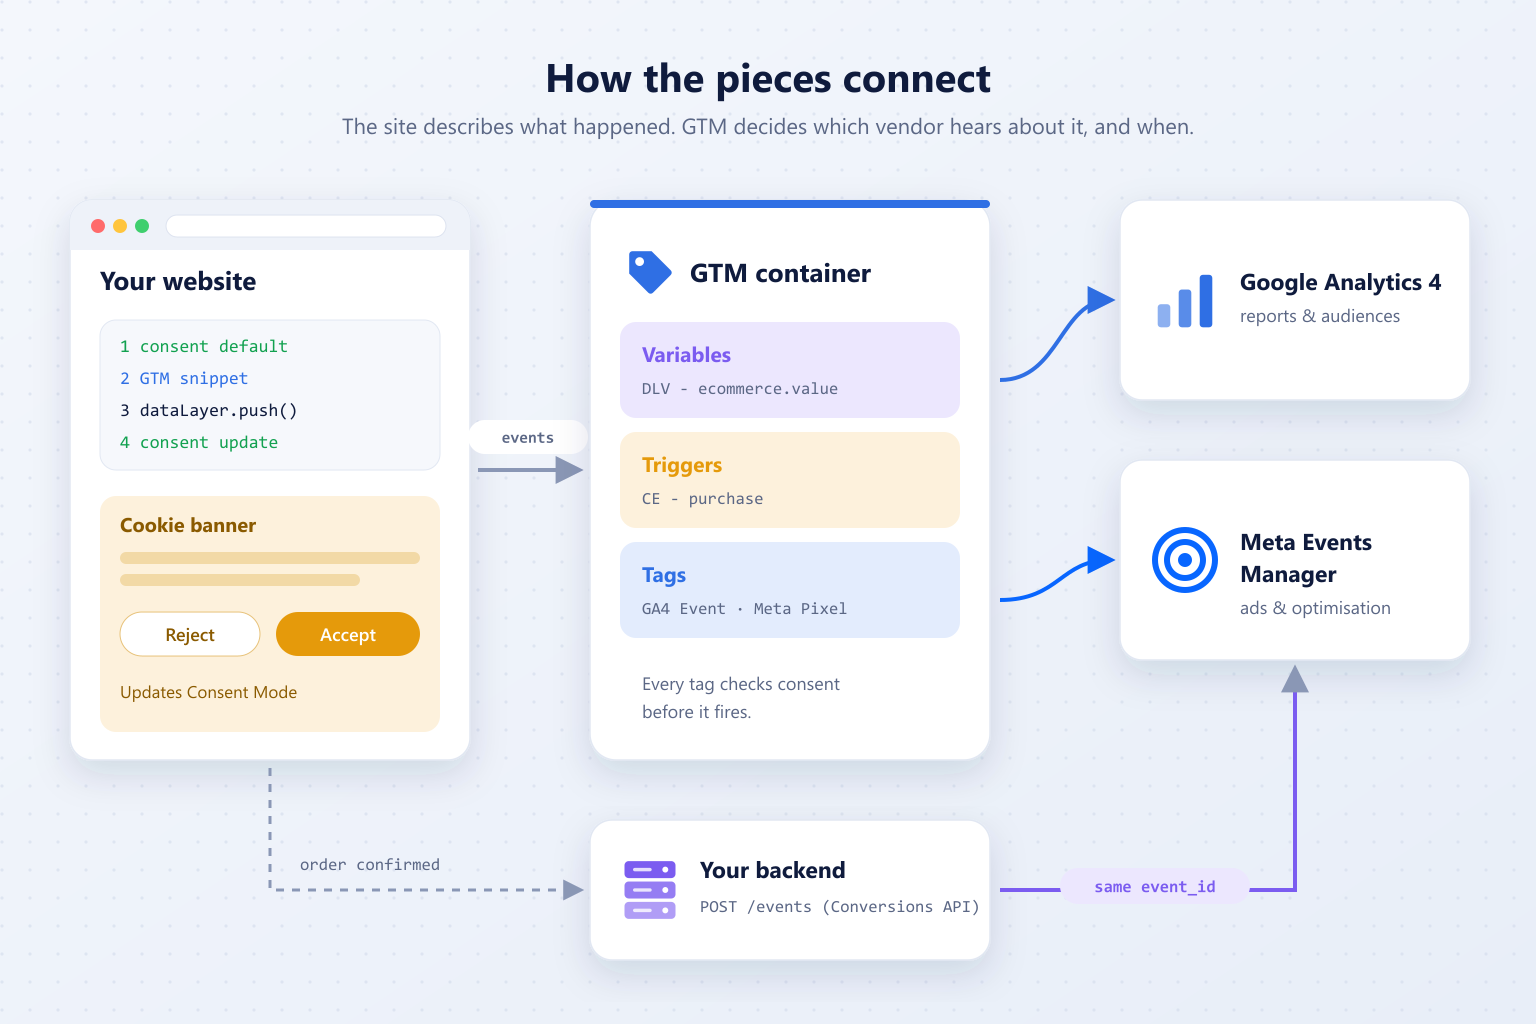
More tags will not fix that. What fixes it is a clear contract between three parties: the website describes what happened, Google Tag Manager decides which vendor hears about it, and the consent banner decides whether anyone may hear about it at all.
This guide wires up GTM and Meta Pixel from scratch with that contract in mind. The examples use an Astro layout, but the same steps apply to Next.js, Nuxt, WordPress or plain HTML.
GTM or a hard-coded pixel?
Both approaches work. The right one depends on who owns the tags:
Hard-code the Pixel when it is the only marketing tag you will run and a developer makes every change.
Use GTM when marketing needs to add, pause or change tags without a deployment, or when several vendors need the same events.
Most sites end up with GA4, Meta and at least one more platform. Loading all of them through a single container keeps consent handling and event naming in one place, so that is the approach we take here.
What we will build
The setup has six steps:
Set Consent Mode defaults before anything else loads.
Install the GTM container.
Push business events to the data layer.
Add the Meta Pixel as GTM tags that respect consent.
Send the same conversions from the server with the Conversions API.
Verify everything before publishing the container.
You will need a GTM web container ID (GTM-XXXXXXX), a Meta Pixel ID from Events Manager and, for step 5, a Conversions API access token generated in the same place.
1. Set consent defaults first
Consent Mode v2 tells Google tags what they may store and send. For visitors in the EEA and the UK, Google expects four signals: ad_storage, analytics_storage, ad_user_data and ad_personalization. The defaults must be in place before the GTM snippet runs, so put them at the very top of <head>:
<script>
  window.dataLayer = window.dataLayer || [];
  function gtag() {
    dataLayer.push(arguments);
  }

  gtag('consent', 'default', {
    ad_storage: 'denied',
    ad_user_data: 'denied',
    ad_personalization: 'denied',
    analytics_storage: 'denied',
    wait_for_update: 500,
  });
</script>
wait_for_update gives an asynchronous cookie banner up to 500 ms to report a choice the visitor made earlier before tags fire. If you use a consent platform such as Cookiebot, OneTrust or Usercentrics through its GTM template, the template sets these defaults for you. Do not set them twice.
When the visitor accepts, update the state and push an event that GTM can use as a trigger:
function onConsentAccepted() {
  gtag('consent', 'update', {
    ad_storage: 'granted',
    ad_user_data: 'granted',
    ad_personalization: 'granted',
    analytics_storage: 'granted',
  });

  window.dataLayer.push({ event: 'consent_update' });
}
The extra consent_update event matters for the Meta Pixel. Google tags adjust their behaviour to consent on their own. A non-Google tag that was blocked on page load is not retried. It needs a trigger that fires after consent is granted, and this event provides one.
2. Install the GTM container
GTM ships two snippets: a script for <head> and a <noscript> iframe for the top of <body>. In Astro, wrap the script in a small component so the container ID comes from configuration rather than being pasted into markup.
Create src/components/common/GoogleTagManager.astro:
---
interface Props {
  id: string;
}

const { id } = Astro.props;
---

<script is:inline define:vars={{ id }}>
  (function (w, d, s, l, i) {
    w[l] = w[l] || [];
    w[l].push({ 'gtm.start': new Date().getTime(), event: 'gtm.js' });
    var f = d.getElementsByTagName(s)[0],
      j = d.createElement(s),
      dl = l != 'dataLayer' ? '&l=' + l : '';
    j.async = true;
    j.src = 'https://www.googletagmanager.com/gtm.js?id=' + i + dl;
    f.parentNode.insertBefore(j, f);
  })(window, document, 'script', 'dataLayer', id);
</script>
Then place it in the layout, directly after the consent defaults:
---
import ConsentDefaults from '~/components/common/ConsentDefaults.astro';
import GoogleTagManager from '~/components/common/GoogleTagManager.astro';

const gtmId = import.meta.env.PUBLIC_GTM_ID;
---

<html lang="en">
  <head>
    <ConsentDefaults />
    {gtmId && <GoogleTagManager id={gtmId} />}
    <!-- meta tags, styles, ... -->
  </head>
  <body>
    {
      gtmId && (
        <noscript>
          <iframe
            src={`https://www.googletagmanager.com/ns.html?id=${gtmId}`}
            height="0"
            width="0"
            style="display:none;visibility:hidden"
          />
        </noscript>
      )
    }
    <slot />
  </body>
</html>
A container ID is public by design, so a PUBLIC_ variable is fine here. Leaving it unset in development keeps local page views out of your reports.
If the site already loads GA4 directly with gtag.js, remove that script once GA4 is configured inside the container. Otherwise every page view is counted twice.
3. Describe events in the data layer
The site should push business facts and leave vendor calls to GTM. A good event says "an order was placed, worth this much, in this currency" and does not mention Meta or Google. Using the GA4 ecommerce schema as the shared vocabulary means GA4 can use it without mapping, and every other vendor can map from it.
On the order confirmation page:
window.dataLayer = window.dataLayer || [];

// Clear the previous ecommerce object so values do not merge across events.
window.dataLayer.push({ ecommerce: null });

window.dataLayer.push({
  event: 'purchase',
  event_id: 'order_10427',
  ecommerce: {
    transaction_id: '10427',
    value: 129.0,
    currency: 'EUR',
    items: [
      {
        item_id: 'SKU-881',
        item_name: 'Trail Jacket',
        price: 129.0,
        quantity: 1,
      },
    ],
  },
});
The event_id is the most important field in this guide. Render it from the server, for example based on the order ID, so that the browser and your backend know the same value. Step 5 relies on it.
Lead forms follow the same pattern with event: 'generate_lead' and a submission ID as the event_id.
Now make those values available in GTM. Under Variables › User-Defined Variables, create one Data Layer Variable per field:
DLV - event_id→event_idDLV - ecommerce.value→ecommerce.valueDLV - ecommerce.currency→ecommerce.currency
Under Triggers, create two Custom Event triggers: CE - purchase on the event name purchase, and CE - consent_update on consent_update.
4. Add the Meta Pixel through GTM
The Community Template Gallery has Meta Pixel templates. A Custom HTML tag is more transparent, though, and makes it easier to see what runs. Store the Pixel ID in a Constant variable named Const - Meta Pixel ID and create the base tag:
<script>
  !function(f,b,e,v,n,t,s)
  {if(f.fbq)return;n=f.fbq=function(){n.callMethod?
  n.callMethod.apply(n,arguments):n.queue.push(arguments)};
  if(!f._fbq)f._fbq=n;n.push=n;n.loaded=!0;n.version='2.0';
  n.queue=[];t=b.createElement(e);t.async=!0;
  t.src=v;s=b.getElementsByTagName(e)[0];
  s.parentNode.insertBefore(t,s)}(window, document,'script',
  'https://connect.facebook.net/en_US/fbevents.js');

  fbq('init', '{{Const - Meta Pixel ID}}');
  fbq('track', 'PageView');
</script>
Configure the tag as Meta Pixel - Base:
Triggers: All Pages and
CE - consent_update. The first covers returning visitors who have already consented. The second covers the page where the visitor clicks Accept.Advanced Settings › Tag firing options: Once per page, so the two triggers never send two PageViews.
Advanced Settings › Consent Settings: Require additional consent for
ad_storage.
Next, create Meta Pixel - Purchase as a second Custom HTML tag, triggered by CE - purchase, with the same consent requirement:
<script>
  fbq('track', 'Purchase', {
    value: {{DLV - ecommerce.value}},
    currency: '{{DLV - ecommerce.currency}}'
  }, {
    eventID: '{{DLV - event_id}}'
  });
</script>
Under Tag Sequencing, set Meta Pixel - Base to fire before this tag, so fbq always exists when the purchase is tracked. The fourth argument, eventID, is what allows Meta to match this event with the server event in the next step.
If you hard-code the Pixel instead of using GTM, use Meta's own consent API: call fbq('consent', 'revoke') before fbq('init', ...) and fbq('consent', 'grant') when the visitor accepts.
5. Send conversions from the server too
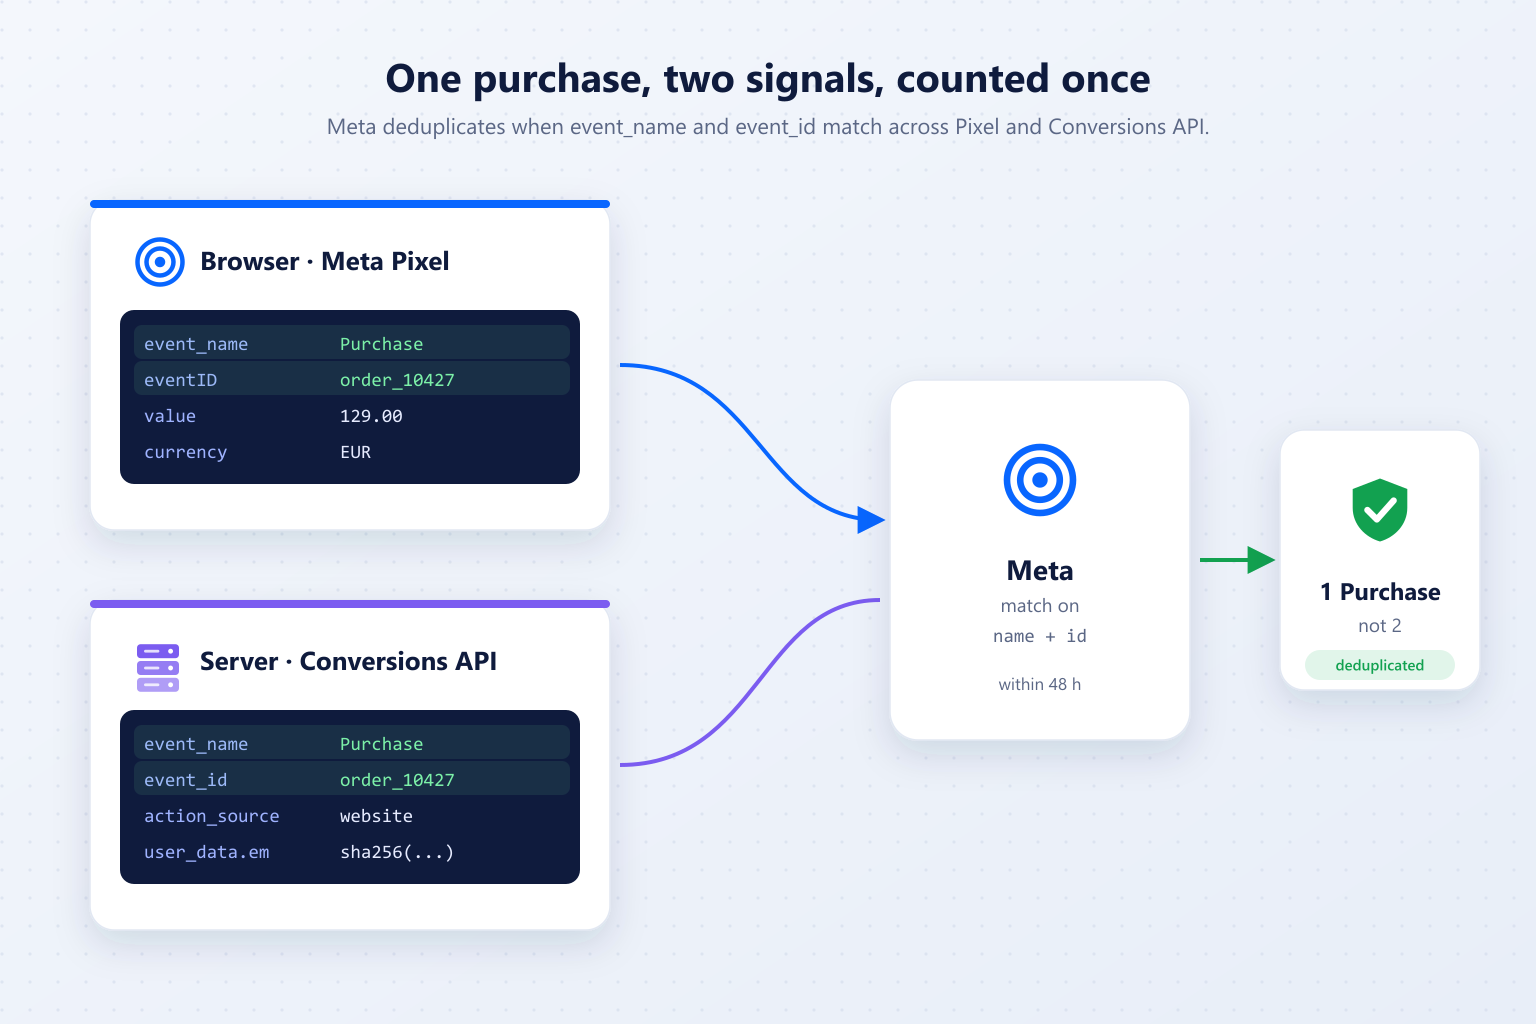
Browser events get lost to ad blockers, strict tracking prevention and visitors who close the tab before the thank-you page finishes loading. The Conversions API (CAPI) sends the same event from your backend, where none of those problems apply. Server events are still subject to consent, so only send them for visitors who granted it.
A minimal sender for Node.js 18+:
// server/meta-capi.ts
import { createHash } from 'node:crypto';

const PIXEL_ID = process.env.META_PIXEL_ID!;
const ACCESS_TOKEN = process.env.META_CAPI_TOKEN!;
const GRAPH_VERSION = 'v23.0'; // use the current Graph API version

const sha256 = (value: string) =>
  createHash('sha256').update(value.trim().toLowerCase()).digest('hex');

type PurchaseEvent = {
  orderId: string;
  value: number;
  currency: string;
  email: string;
  sourceUrl: string;
  clientIp: string;
  userAgent: string;
  fbp?: string; // value of the _fbp cookie
  fbc?: string; // value of the _fbc cookie
};

export async function sendPurchase(event: PurchaseEvent) {
  const body = {
    access_token: ACCESS_TOKEN,
    // test_event_code: 'TEST12345', // uncomment while testing in Events Manager
    data: [
      {
        event_name: 'Purchase',
        event_time: Math.floor(Date.now() / 1000),
        event_id: `order_${event.orderId}`,
        action_source: 'website',
        event_source_url: event.sourceUrl,
        user_data: {
          em: [sha256(event.email)],
          client_ip_address: event.clientIp,
          client_user_agent: event.userAgent,
          fbp: event.fbp,
          fbc: event.fbc,
        },
        custom_data: {
          value: event.value,
          currency: event.currency,
        },
      },
    ],
  };

  const res = await fetch(`https://graph.facebook.com/${GRAPH_VERSION}/${PIXEL_ID}/events`, {
    method: 'POST',
    headers: { 'Content-Type': 'application/json' },
    body: JSON.stringify(body),
  });

  if (!res.ok) {
    throw new Error(`Meta CAPI ${res.status}: ${await res.text()}`);
  }
}
Call it from wherever the order is confirmed: a payment webhook, an order subscriber or the checkout API route. Do not call it from the thank-you page render, which runs again every time the visitor refreshes.
Meta counts the Pixel event and the server event as one conversion when three things are true:
event_nameis identical, including case.Purchaseandpurchaseare two different events.The Pixel's
eventIDequals the server'sevent_id.Both arrive within 48 hours of each other.
Hash personal identifiers such as email and phone after trimming and lowercasing them. Send the IP address, user agent, fbp and fbc unhashed. They improve match quality and Meta expects them in plain form.
6. Verify before you publish
A GTM container change goes live for every visitor the moment it is published, so test in this order:
GTM Preview (Tag Assistant). Load the site without accepting cookies. Both Meta tags should appear under Tags Not Fired, and the Consent tab should show every signal as denied. Accept, then confirm that Meta Pixel - Base fires exactly once on
consent_update.Network tab. GA4 requests to
/g/collectcarry agcsparameter:G100means ads and analytics storage are denied,G111means both are granted. Requests tofacebook.com/trshould not appear before consent.Meta Pixel Helper. The browser extension lists every Pixel event on the page, including the
eventIDsent with Purchase.Events Manager › Test events. Enter your site URL for browser events and set
test_event_codein the CAPI payload for server events. A test purchase should show both sources, and the server event should be marked as deduplicated.
When everything checks out, publish the container with a version name and a note that says what changed. The version history is your only audit trail.
Common mistakes
Loading the same tag twice
A gtag.js snippet in the code plus a GA4 tag in GTM, or the Pixel base code in the layout plus a Pixel tag in the container. Each one doubles your numbers. Pick one home for every vendor.
Setting consent defaults after the container
If gtag('consent', 'default', ...) runs after gtm.js has started, tags can fire before any consent state exists. The defaults belong above the GTM snippet.
Gating the Pixel without a retry trigger
With only an All Pages trigger, a consent-gated Meta tag is blocked on the page where the visitor accepts and does not fire until the next page load. Add the consent_update trigger and limit the tag to once per page.
Mismatched event names or IDs
A Pixel Purchase with eventID: order_10427 and a server Purchase with event_id: 10427 are two conversions. Generate the ID in one place and pass it through.
Exposing the Conversions API token
The access token can send events to your Pixel on your behalf. Keep it in server-side environment variables and never in anything bundled for the browser, including a PUBLIC_ or NEXT_PUBLIC_ variable.
Forgetting the Content Security Policy
If the site sends a CSP header, allow www.googletagmanager.com and connect.facebook.net in script-src, and www.facebook.com plus your GA4 collection endpoints in connect-src and img-src. Blocked requests fail silently unless you check the console.
Testing and production checklist
Before publishing the container:
Consent defaults render above the GTM snippet on every page.
There is exactly one GA4 configuration and one Meta Pixel base tag.
Every Meta tag requires
ad_storageand fires once per page.Conversion events carry an
event_idthat the server also knows.Server events are sent only for visitors who consented, and only once per order.
Test events show browser and server purchases deduplicated.
Only a few people can publish the container, and every version has a name and notes.
Final thoughts
Wiring up GTM and Meta Pixel takes about an hour. Keeping them trustworthy takes the right boundaries: the site describes what happened, GTM routes it, consent gates it, and one event ID ties the browser and the server together.
Once that contract is in place, adding the next platform, whether LinkedIn, TikTok or a server-side GTM container, means adding one tag to an existing event instead of touching the site again.